fbpx

Homemade Dill Pickles

We made pickles!

Homemade Dill Pickles by Lacey Baier, a sweet pea chef Dustin and I have been talking about making pickles for what seems like forever.

Homemade Dill Pickles by Lacey Baier, a sweet pea chef You would not believe how easy it is, either. After making Fresh Peach Jam this summer, I thought pickles would be similar in the amount of work.

Homemade Dill Pickles by Lacey Baier, a sweet pea chef Truth is — pickles are even easier. Basically: Cut, Pour and Seal.

Homemade Dill Pickles by Lacey Baier, a sweet pea chef The hardest part is having to wait at least one week while the pickles — well — pickle.

Homemade Dill Pickles by Lacey Baier, a sweet pea chef After doing some research, I chose a method for pickling the cucumbers that would make them as crisp as possible. ‘Cuz that’s how we like our pickles in the Baier household.

Homemade Dill Pickles by Lacey Baier, a sweet pea chef Oh — and please learn from my super annoying mistake and don’t buy your pickling cucumbers four days early. Those little guys go bad fast! On Tuesday when I bought them, they were good and crisp but, on Thursday, they were already turning soft and even liquefying. Not so good for crisp pickles. Boo.

Homemade Dill Pickles by Lacey Baier, a sweet pea chef Needless to say, I had to buy seven pounds of pickling cucumbers twice. (Um…sorry to anyone who wanted to make pickles that week and shopped at my grocery store. I cleaned them out. Twice.)

Homemade Dill Pickles by Lacey Baier, a sweet pea chef This recipe for dill pickles is a pretty basic one. We wanted to start with a simple recipe on which we could build.

Homemade Dill Pickles by Lacey Baier, a sweet pea chef I really like bread and butter pickles so that’s definitely on my list. You can also add cloves of garlic or peppercorns to flavor the pickles if you so choose.

Homemade Dill Pickles by Lacey Baier, a sweet pea chef Happy pickling!

ASPC on Instagram

If you give this recipe a try, let me know what you think by leaving a comment and rating it. And don’t forget to take a picture and tag it #asweetpeachef on Instagram! I LOVE seeing what you come up with. Enjoy!

5 from 3 votes
Homemade Dill Pickles Square Recipe Preview Image
Homemade Dill Pickles
Prep Time
2 d
Cook Time
30 mins
Total Time
2 d 30 mins
 
This recipe was adapted from Simple Bites' Garlic-Dill Pickles and Better Home and Garden's Best-Ever Dill Pickles. Makes some tasty dill pickles.
Categories: Side
Difficulty: Easy
Keyword: dill pickle recipe, how to make dill pickles, pickle recipe
Servings: 12
Calories: 125 kcal
Author: Lacey Baier of A Sweet Pea Chef
Ingredients
Tools You'll Need
  • Large Canner with Lid
  • 7-10 1- Pint Canning Jars Lids and Bands
  • Large Pot
  • Wide-Mouth Funnel
  • Small Saucepan
  • Jar Lifter
  • Silicone Tongs
  • Clean Cloth to wipe rims
Ingredients
  • 7-8 lbs pickling cucumbers preferably 3-4-inches and crisp
  • 1 1/2 cups pickling salt divided
  • 6 cups water
  • 6 cups white vinegar
  • 1/2 - 3/4 cup granulated sugar use less if you really want to limit sweetness
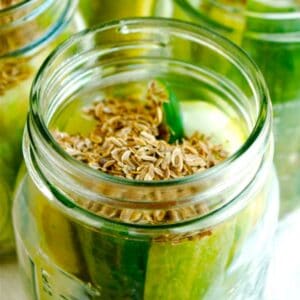
  • 9 tbsp dill seeds
  • Optional: whole peppercorns garlic cloves
Instructions
  1. Day 1 (Do this step if you want to maximize crispness)
  2. Gently scrub cucumbers under running water to remove dirt and prickly bits. Trim off 1/8-inch from each end and prick all over with a fork.
  3. In a large bowl, layer cucumbers and 1 cup pickling salt using about one-quarter of each per layer. Add enough cold water to cover by about 1 inch. Place a plate on top to weigh down the cucumbers. Cover and let stand at a cool room temperature for 12-24 hours.
  4. Day 2
  5. Wash canning jars thoroughly in hot, soapy water and rinse well. Fill the jars with hot water and place in the canning pot. Fill the canning pot with hot water, making sure the water covers the jars by at least 1 inch. Cover the pot and bring the water almost to a boil over medium-high heat for at least 30 minutes. When the water is almost boiling, reduce the heat to keep at a simmer and keep the pot covered until you’re ready to use the jars.
  6. In a small saucepan, bring approximately 2 inches of water to a simmer. Add the lids, cover the saucepan and remove from heat.
  7. Rinse the cucumbers well and drain. Slice into spears (quarters, lengthwise) or into 1/4-1/2 inch slices and set aside.
  8. In a large pot, combine the remaining 1/2 cup pickling salt, sugar, water, and vinegar. Bring to a boil over medium-high heat, stirring often until salt is dissolved. Boil for 1 minute. Reduce heat to low and keep liquid hot. Keep covered to prevent evaporation when you’re not using the liquid.
  9. Use the jar lifter to lift a jar out of the simmering water. Pour the hot water out into the sink and put the jar on a towel on the counter. Pack cucumbers into the jar, leaving about 1/2 inch headspace. Place the canning funnel over the jar and, using a ladle, pour hot pickling liquid into the jar, leaving 1/2-inch headspace. Add 1 tbsp. dill seed into the jar. Wipe the rim with a clean cloth or paper towel dipped in warm water. Using the silicone tongs, remove a lid disk from the saucepan of hot water and place it on the jar. Wipe jar rim and adjust lid until tight. Repeat with remaining pickles and jars. Discard any remaining hot vinegar mixture.
  10. Place the jars into the canner and return to a boil. Process for 10 minutes (start timing after the water has reached boiling again). Turn off heat and remove the lid from the canning pot.
  11. Use the canning tongs to transfer the jars to a clean towel on the counter and let them stand for 24 hours. The lids will make a "pinging" noise as they cool -- this is the jar sealing. Any jars that do not seal should be refrigerated.
  12. Let stand 1 week. Chill pickles thoroughly in the refrigerator prior to opening for best texture.
Nutrition Facts
Homemade Dill Pickles
Amount Per Serving
Calories 125 Calories from Fat 9
% Daily Value*
Fat 1g2%
Saturated Fat 0.1g1%
Sodium 908.2mg38%
Carbohydrates 24.9g8%
Fiber 2.4g10%
Sugar 4.9g5%
Protein 2.5g5%
Vitamin A 50IU1%
Vitamin C 11.6mg14%
Calcium 130mg13%
Iron 1.6mg9%
* Percent Daily Values are based on a 2000 calorie diet.


Lacey Baier

Hey y’all, I’m Lacey Baier and I’m so glad you’re here! I’m a healthy lifestyle influencer and the creator of this clean-eating blog and YouTube channel, A Sweet Pea Chef. My recipes have been published on Food Network, Good Morning America, FoxNews, Tastemade, Fitness Magazine, and much more. I live in Dallas, Texas with my husband and four kiddos. Let’s get started!

31 thoughts on “Homemade Dill Pickles

  1. Is it possible that the brine turns white if the salt used is iodized/Has iodine in it. I was researching pickeling salt as I don’t have that in my cupboard. But I have noniodized salt. Any scientists out there? Thanks for your recipe! I’ll let ya know how they turn out!

    1. do not use table salt in canning unless receip calls for it.. and canning salt and kosher are surprisingly cheap 🙂

  2. 5 stars
    These look delicious! Thanks for sharing your homemade pickles recipe Lacey! I’m definitely going to vouch for the peppercorns and garlic once I make it! I love those two ingredients. I’ll report back once i’ve made it!

  3. What would happen if I wanted to add more sugar? I like sweet garlic dills, but this doesn’t sound like enough sugar.

  4. This Fri will be 1 week of pickleing my cucumbers. I layer them just like you said and filled with soft filtered water. I have never done this before. is there suppose to be an odor ? I know I will be rinsing salt but does not look very nice. almost looks lie it is fermenting or something. I have never done this before. Just wondering if this is all correct ? Will be canning fri

  5. Hi lacey

    Your website is beautiful ! This is the first year ever cann cucumber pickles. I think all should be fine your recipe is very easy to follow all should go well if I follow instructions. You said leave the bowl of cucumbers in a cool room temperature place. I have decided to be patient + pickle the cukes for 1 week in the pickling salt. Is this going to be ok to leave the bowl on kitchen counter ? Or where would be a safe place to leave them for 1 week. I do not want to ruin the cukes.

    1. I’m so glad you found the directions helpful and easy to follow. As long as your counter isn’t in direct sunlight or near heat, it should be fine. Otherwise, a cool, dark pantry is ideal 🙂

  6. So I waited about 1.5 weeks to try one. Very good, fairly crispy (considering they have been heated when processing. They are a bit salty though(although not too much of a problem for me because I like salt). Can I use less salt on the overnight soak and still get the benefit of the salt drawing out some of the moisture from the pickles?

    1. Hi Celeste. Unfortunately, I don’t know that answer to that. I would imagine you can, but I’m not entirely sure. I would be more inclined to reduce the amount of salt that actually goes into the pickling mixture, since the salt from the day before gets washed off…If you do try a variation, I would love to know how it turned out. Thanks for the feedback and good luck!

    1. Uh oh! That’s no good. I found this helpful summary in what may be wrong at http://www.pickyourown.org/picklesFAQs.htm. Here’s what they say:

      “You probably used overripe cucumbers or didn’t measure the vinegar and water accurately. Of course, processing too long in the boiling water bath can do it, too! You may have noticed that the best crisp store-bought pickles are the ones stored in the refrigerators, not on the room-temperature shelves. That is because they have not been heat treated. The same is true with home pickling…Overall, you’ll get the crispest pickles from using young, small cukes.”

      There’s a lot of other helpful suggestions on that page. Have you ever been able to make them crunchy? With other recipes? Sorry and good luck!

  7. We have dill pickled for years and our recipe is quite similar to yours (sans the soak for 24 hours); however, this summer out of 165 quart jars, the brine in 1/2 of the jars turned a milky white color within a month (we let ours “pickle” for 90 days). We have eaten them and thank God, haven’t gotten ill; however, they’re not pleasing to share with friends and family. Any suggestions to prevent the milky brine? Thanks, a pickling friend

  8. Like em spicy? Add a half a slice of a hananero to each jar 🙂 yum!

    Great recipe, thanks for sharing. Going to be doing this with my daughters this weekend!

  9. Years ago,up in northern Maine, when my hair was long, I made a GREAT dill pickle.Fast and easy, everyone raved. Sterilized bottles, 1/3rd full of fresh dill heads,washed cucumbers. Pour in BOILING brine {half vinegar}
    and seal.
    Years later in Maryland, it would not work, or should I say it DID “work”? Jars would not stay sealed. Thought I had just lost my touch. It turns out that, back then, the vinegar was stronger. (?)

  10. I’ve commented too much; it won’t let me reply!

    Anyway. Don’t worry. We’re still eating them; they’re just more like… nibbling pickles. AND, I put whole cloves of raw garlic in each jar — about 5 per — and now I’m wishing I added more garlic, because they turned out crunchy, tasty, and not too salty! YUM!

    And I’m sure the second batch will turn out fine.

  11. I made these today, after soaking them in saltwater for 24 hrs as you suggested. Well, about 18 hours. I’ve pickled a number of things, but never cucumbers, oddly enough! But, I’m in a CSA, and got about 7-8 lbs of Straight 8 cucumbers, and the farmer said they pickle nicely. I didn’t have dill seed, but I had dried dill weed, and I put 5+ cloves of garlic in each jar, and a tsp of peppercorns in half of them. AND… I made them in quart jars. It made four quarts.

    Your post was so timely! I’m linked to Chowstalker on FB, so when they posted this on the day I was thinking about making pickles, I figured it was divinely inspired. 😀 Thank you for your recipe!

      1. They LOOK great, and everyone is counting the days until Saturday… Your recipe says to let them sit a week before eating. 🙂 I’ll let you know how they taste.

      2. OK. We opened them a day early, and they were CRAZY SALTY. Nearly inedible.

        I have a bunch more cucumbers that I need to pickle, so I looked again at your recipe, and I may have found the problem: In the ingredient list, it says “1 1/2 cups pickling salt, divided” and in Day 1’s instructions, you say to layer the fork-pricked pickles with 1 cup salt. In Day 2’s instructions, it says to “combine pickling salt, water, and vinegar.” I used the whole 1 1/2 cups of salt in my brine, when perhaps I should have subtracted the 1 cup I had used for soaking, and used only 1/2 cup in the brine! Yes?? I am going to try today’s brine with only 1/2 cup. If that is correct, you may want to amend your instructions to say “combine 1/2 cup pickling salt, water, and vinegar.”

        One more quibble: The ingredient list calls for 3/4 cup sugar, but it isn’t used in the instructions at all. Would this be added to the brine if one desires bread & butter pickles?

        Thank you for your recipe! I absolutely don’t regret making my too-salty pickles, but a little more clarity might be in order to save others from the same mistake.

      3. Oh no, Karen!!!! I’m SO extremely sorry for your too-salty pickles. That’s horrible 🙁

        Yes, you are correct that you are only to put the remaining 1/2 cup of the pickling salt into the brine on Day 2. Ugh — I feel just awful that wasn’t more clear.

        As for the sugar, you are supposed to also add that into the brine along with the 1/2 cup pickling salt. I found 3/4 cup to be just a bit too sweet for my tastes, so I’d recommend using a little less — maybe 1/2 cup, though I haven’t yet tested it.

        I’ve gone ahead and clarified those two points in my recipe. Again, I’m very sorry and I hope your new batch comes out better.

Comments are closed.

Recent Posts